At each of our three Uprising World Premiere events, cosplayers brought their best skills to the table with incredible renditions of the heroes of Rathe. Guest writer and cosplayer Morgan McKenyon joins us to explain how she created her Dromai cosplay for the Las Vegas event, and share some tips and tricks to keep in mind if you'd like to begin your own cosplay! You can find Morgan on Instagram at HappyLadyMorgan.
Why Dromai?
On Uprising reveal day, I'm hanging out at my LGS when our good friend, Pete, comes running across the room to show me the new art tiles that had just announced the new heroes of Uprising, Dromai and Fai. He says, "New cosplay, Morgan?" and my mouth drops wide open at the sight of this gorgeous, imperial, powerful woman wearing the coolest looking outfit.
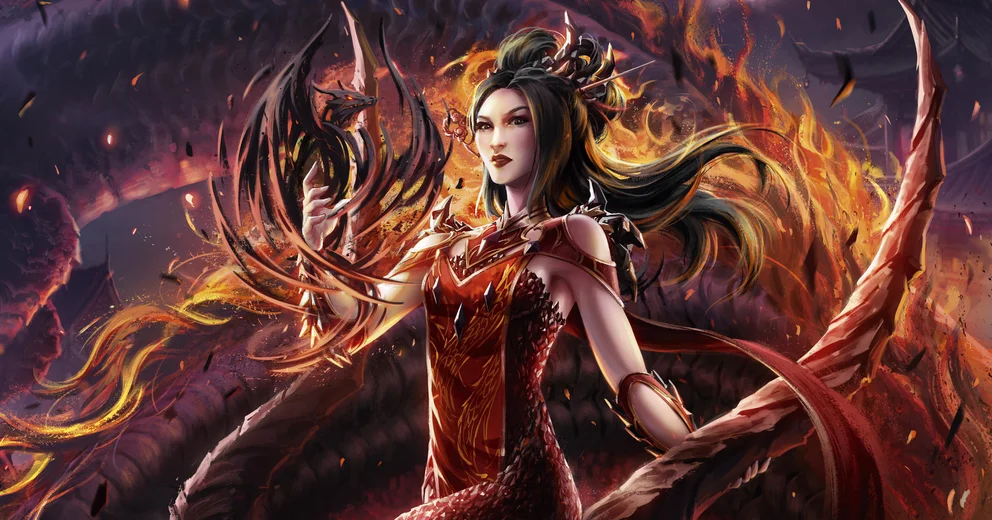
Everything about Dromai catches my eye, the fitted scaly bodice, the soft yet tough armor, the SHOES! My goodness! I had to go for it.
The moment we get home I start my cosplay shopping list when I’m hit with the thought-
"Where do I even start?"
Dromai, like all other heroes, has many separate, special pieces to her full look. Many different techniques need to be used in this costume including hand sewing, machine sewing, foamsmithing, airbrushing, sculpting, molding, casting, and more.
When designing your timeline for a cosplay it's important to work backwards from the complete costume in your head before writing it all down on a notepad. Imagine yourself wearing the full costume, and remove the pieces one by one, this will help you decide what pieces may need to be combined to form one larger piece during construction. It's also very important to figure out which pieces or parts of the costume will take the longest to complete, and start those pieces early on.
In my case, the first part of the costume I went for was the bodice/leotard. It was challenging deciding what I was going to do in order to recreate the appearance of dragon scales. I may have come up with four or five different ideas before I settled on one.
Bodice
Techniques used: Canadian Smocking
This took me 35+ hours to complete and features four yards of crushed velvet completely hand sewn to mimic a dragon scale pattern by using 2"x 1" grids to sew hundreds of triangles in the fabric. I’ve never used this method prior to making Dromai so it was a fun new challenge for me.
Once the full panel of scales was completed I draped the fabric over my mannequin and started hand sewing the fabric in place over a sheer leotard I made beforehand. The fabric scales were cut carefully at the hem and in the areas they would be hand sewn together to create a seamless spiky transition all around the bodice.
Shoulder and Neck Pieces
Techniques used: custom pattern draping, foamsmithing, airbrush, hand-painting
I started out by taping plastic wrap to my mannequin in order to cover the portions I needed to make the pattern. Once my mannequin was covered sufficiently, I used packing tape all over the plastic to create a pattern base that fit snugly to the shape of the body.
What's this? You don't have a mannequin? Well, good news! You can make one yourself using duct tape, plastic wrap, and/or unwanted light clothing; just search up “duct tape dummy” on the internet .
I am only drawing half of the pattern for the neck piece. With symmetrical pieces only half of the pattern needs to be drawn because you will be using it to create both sides of the costume.
Originally the neck and shoulder pads were going to be one piece, but due to mobility issues and how funky the armor looked when sitting on my shoulders I opted to separate the piece, allowing for my arms to move more freely while the shoulder pieces sat more organically at rest.
I used EVA foam to create the neck and shoulder armor. These were adhered using contact cement, which you can find at most hardware/home improvement stores. After tracing and cutting out the foam pieces I added a thin layer of contact cement to the proper edges, letting them dry out completely before adhering them, permanently, to each other.
Let it be known that I also did this in my open garage to allow air to ventilate the room, which is super important when working with materials like this!
Most of these foam pieces were covered in a thin layer of specialty rubber coating before adding a few layers of paint, either by hand or with my airbrush. After painting/airbrushing the armor with the appropriate paint I let it dry out before going back for one last coat of the clear rubber paint to seal it and prevent any scuffing/surface damage from occurring down the road.
Gauntlets
Techniques used: sculpting, casting, custom stencil, airbrush
These pieces, like the shoulder and neck armor, were created using EVA foam, and adhered with contact cement. The armor stencil was made by first making a base pattern with plastic wrap and duct tape around my forearm. I divided the measurement from the largest width and the smallest width on my arm by 4, folded a few sheets of paper in half, and used those new numbers to measure and draw a more tidy gauntlet shape on one half of the paper before cutting it to be one symmetrical piece.
Once the gauntlet paper patterns were cut out I traced them all multiple times on a sheet of EVA foam. In order to line up the stencil and foam I used fabric basting spray, an extremely light and temporary adhesive, on the paper stencils and foam so I could airbrush the patterns on each gauntlet without the paper flying all over the place.
Each piece of the gauntlet pattern was cut out from the sheet of foam after airbrushing everything and was assembled using contact cement. They open and close like a clamshell to fit around my forearms. Velcro was used to help keep the gauntlets closed around my arm, I attached it to the armor with hot glue and made sure to glue over the front facing edges and corners of the velcro so it would not peel away from the hot glue if I opened my gauntlet with force.
Each gauntlet has 9 large spikes attached to it by your friendly neighborhood hot glue gun. Those spikes were created by first sculpting one large and one small spike out of Plastina, an oil based clay. I was able to conveniently use my studio desk as the base for this mold as well as a few others, and created a sturdy barrier with oil clay and mat board before molding the pieces using a 2-part tin-cure silicone rubber compound.
It’s important to use a release agent with your molds, especially if the oil-based clay you’re sculpting with has sulfur in it, or it will be very difficult to remove, so be sure to use a release spray on your sculpt first before pouring rubber all over it. Removing the initial sculpt from the mold can be tricky at times, especially in warmer environments. I was able to more easily and quickly remove my oil-based clay pieces after putting the mold into the freezer for a few minutes to help better solidify the clay.
Once the mold had been cleaned and prepared with a release agent I could then start the casting process.
The cast was made with a 2 part fast-setting plastic compound. Once all scales were cast, they were cleaned, prepped, and painted black to mimic the look of obsidian scales. They were added to the gauntlets using hot glue.
Tabard
Techniques used: machine sewing, pattern making
The tabard and tails are both made from the same pattern and have a felt interior to make the fabric look and feel more robust. I used satin, which is thin and can be pretty finicky, so the felt provided a solid base.
The dragon pattern was freehanded to look similar to the pattern in the artwork. I used an exacto knife so that I could cut and apply the fabric in one piece. All pieces were assembled with basting spray, and sewed together using gold thread with a zigzag stitch on my sewing machine. After completing the front side, I attached a flat red satin panel to the back of the tabard and sewed the edges together. Gold pleather trim was applied around the tabard and tails to neatly conceal and finish the edges.
The obsidian diamonds on Dromai’s tabard were made alongside the gauntlet scales using the same process. These were then sanded down to have smooth facets and were attached to the garment with hot glue.
Boots
Techniques used: duct tape dummy, sculpting, casting, sanding, painting, airbrush
The tabard and tails (tails not yet pictured) are both made from the same pattern and have a felt interior to make the fabric look and feel more robust. I used satin, which is thin and can be pretty finicky, so the felt provided a solid base.
The dragon pattern was freehanded to look similar to the pattern in the artwork. I used an exacto knife so that I could cut and apply the fabric in one piece. All pieces were assembled with basting spray, and sewed together using gold thread with a zigzag stitch on my sewing machine. After completing the front side, I attached a flat red satin panel to the back of the tabard and sewed the edges together. Gold pleather trim was applied around the tabard and tails to neatly conceal and finish the edges.
The obsidian diamonds on Dromai’s tabard were made alongside the gauntlet scales using the same process. These were then sanded down to have smooth facets and were attached to the garment with hot glue.
Shin Guard
In this case, we used the above-mentioned techniques to create the shin guard just like we did with the EVA foam gauntlets. The guard is held to the leg via Velcro and is very easy to both put on and remove. Remember to glue over the edges of velcro if it’s your medium of choice since it has a pesky tendency to peel away from the hot glue if it’s not partially covered on the top edges.
Wings
Techniques used: foamsmithing, belt sander, sculpting, airbrush
The wings were made during spoiler season when I finally saw the artwork for “Red Hot” revealed. This way I got a better idea of how I could translate Dromai’s wings to better suit my “mostly” accurate costume.
EVA foam was used to create the wing body and talons. They were first adhered using contact cement and shaped using a belt sander. I liked using the sander because I could mimic those conchoidal shapes you normally see in obsidian on the talons.
The smaller spikes were made using Apoxie Sculpt, which is wonderful because it solidifies rock-hard and doesn’t shrink or crack when curing allowing for many details to be kept without compromising durability.
I used only two colors to airbrush this set of wings; red and brown.
Sewn to costume with hooks and loops, the wings are the one element of the costume I will need help with during final assembly.
Horns and Wings
Technique used: sculpting, molding, casting, paint
These horns were sculpted, casted, primed, and painted like the rest of our spikes before being hot-glued to a large hair clip covered in EVA foam. Matching accents were added, including leftover scales from our giant “boot sock” and some mother of pearl spikes.
Giant hair pin made with apoxie sculpt, jewelry wire, preset string of ornamental beads from the local hobby store, red cord, and a giant knitting needle sprayed white (the base color was rose gold so only spraying the pin white and letting it scratch up a bit gave a more convincing “bone” look).
Hairstyle
Hairstyle using Got2B Glued hairspray and a standard blow dryer, styled by myself as well as makeup. I tied my hair into a ponytail and separated small rows one by one, rolling and spraying the coils into place until it looked pretty voluminous.
What a whirlwind that month was, from start to finish. I am so grateful for all the folks who came out to the Calling and Uprising premier in Las Vegas, everyone was so encouraging and kind!
My favorite part of the costume making process is when I am finally done (surprise, surprise.) There’s nothing quite like looking back on the hundreds of hours of work spent on a project so you can say “Yep, I did that.”
There are tens, if not hundreds of things I can point out that are “wrong” or “bad” in this Dromai costume in my opinion. I’m mentioning this because it can be such a hurdle for cosplay hopefuls to get started when they feel this way about their work. Folks, I feel this way every time I start something new.
On top of that, even though I’ve been making props and costumes for over a decade, I will ALWAYS learn and try something new when starting another cosplay. There will always be imperfections. What you want to focus on is bringing the character to life, work both in and out of your comfort zone, and have fun! This is a hobby for most of us, we do it for ourselves, so there is no need to stress when making something fun for yourself :-)
PLEASE remember to wear safety gear where/when necessary. A lot of materials in this genre of fabrication are caustic, and can be extremely hazardous if you are not dressed appropriately and/or not in a room that is well ventilated. The plastic compound can be especially dangerous if you’re not careful because it cures via chemical reaction in an instant and is EXTREMELY hot during that time. In this case you would want to protect your eyes, skin, and respiratory system, so make sure you have the appropriate gear before getting started .
Sewing machines can be rough. If you’re not using the right needle with the right tension, or the right thread, or the right sewing foot, or the right stitch, many things can go wrong. One quick way to avoid this issue is to research the types of fabric and thread you plan to sew with for your project. Keep in mind that working with different fabric types at the same time (i.e quilting fabric and spandex) will also raise more complications while sewing, as they all behave differently under the same needle.
I must give credit where it’s due, so I would like to shout out our friend, Ryan, for helping me out at 3:30am the night before the Las Vegas Uprising Premier by cleaning all of my casted plastic gauntlet scales with acetone in order to prepare them for me to paint. “It was basically 50% of the costume.”
Most of all, I’d like to thank my husband, Matt, for encouraging me to cosplay again, for cheering me on, and for keeping me on schedule when I really needed the push. You rock!
Morgan McKenyon is a Flesh and Blood player, cosplayer, and an author of content relating to cosplay. The opinions expressed in the above article are her own and do not necessarily reflect the views of Legend Story Studios.