Valera wowed the crowds at Calling: Krakow with her Ira, Crimson Haze cosplay, and recently joined us at Pro Tour: Lille as a guest cosplayer. Today she joins us for the second article in our Cosplay Corner series, discussing how to cosplay your favourite hero or card without breaking the bank.
One of the reasons cosplay is so intimidating as a hobby is the price range of both store bought and handmade cosplays. Many cosplayers thus choose to make their own cosplays, with the help of tutorials. This is where a new problem comes to light.
If you've ever seen a cosplay tutorial for an entire cosplay, you might have seen the price and it might have had three or more digits in the cost. But what if I told you you could make an amazing cosplay in under 50 dollars?
The truth is, cosplay is most expensive when you're just starting this hobby. This is mainly because prior to that, many people just don't have the tools that are needed to make one, such as a dremel or a hot glue gun. But let's put those aside for now.
If you're new to the whole thing, you might have heard of materials such as EVA foam or worbla. But forget about those as well.
Sewing is also a challenge for everyone who doesn't have a sewing machine. Either you will take too long or you'll have to invest in yet another tool. But you know what? Forget about that too.
So what should you be thinking about?
Let's Start With the Basics
Each cosplay can be stripped down to the basics:
- Hair / Headgear
- Clothes and Shoes
- Props
- Accessories
We’re gonna cover each of those, looking at the cheapest option, but also the option that will let us have a quality product. Then, we’ll go through the average prices to get the base price for that part of the cosplay.
1. Hair / Headgear
With hair, if your natural hair matches the one of the character you want - great! If you’re open to cutting / dyeing it to match - also great! However if neither of those options apply to you, you might need a wig. Second hand wigs exist in some countries, but your safest bet is buying a wig off of cheaper sites and working towards saving it or styling it.
So let’s put a price on that. The average price for a cheap wig (that isn’t necessarily bad) is between 6 and 20 dollars (with FREE shipping). I would recommend buying a longer wig and working it out from there. Wig = $15.
2. Clothes and Shoes
Think about closet cosplays for a little bit. Just using the things you already have at home. Also think about reusing materials you have. Those old sheets grandma gave you that you know you’re not gonna put on your bed? Give them a new life with your cosplay. Those boots you bought ages ago that somehow still fit you? Repurpose them! Cosplay is a very creative hobby, so instead of going out and buying materials to sew an outfit from scrap - get creative. A skirt can become a harness just as easily as curtains can become a flowy cape.
If you don’t have anything at your disposal, ask a friend, a family member or somebody in one of those ‘sharing is caring’ groups. They do say one man’s trash is another man’s treasure for a reason. And if not even that works, second hand shops will almost always have what you need.
If you end up having to buy something, most shirts at second hand shops cost up to $5, with pants being a bit more expensive, dresses around 10-15$ and fur coats $15 and up.
So let’s average this out and say that you have to buy 3-4 clothing articles, each costing $5 and you found the rest.
You got a shirt that was the wrong color tho, so what now? Boil it in tea — and no, I’m not joking. Fabric colors can get a tad expensive if you’re doing a budget cosplay and counting every dime and penny, but using tea bags or fruits is a legitimate way to give your plain white material the color it needs. So soak that bad boy in a pot of blueberry tea for a nice vibrant pink or in a pot of boiling spinach for a green color. If you don’t have these at home, ask a neighbor or just go and buy - it will most often come out costing less than that fabric dye. Around $2 for a pack of tea or whatever you need.
Giving us a total of:
Clothes and shoes = $22
3. Props
Sure, worbla and foam props look really good, and don’t get me started on 3D-printed ones. But consider this - paper and cardboard. Paper is actually much more durable than you would think. The Japanese have something called origami — the art of folding paper — and with this knowledge, you can make just about anything. Add enough layers and maybe some cardboard to reinforce it, and you’ve got yourself a sturdy sword or a strong shield. Let’s say you’re spending half a buck on this part, even though most of you have this at home.
The only thing left is making it the right color, but don’t worry - markers will do just as fine as acrylic paint, so just pick what you work with best. Buying whole sets of markers/dyes will just make you lose more money, so head on to your nearest hobby shop to buy the individually packed ones in the colors you need. Let’s say you need three colors - red, silver, and gold. A regular marker should cost around $2.50 for the effect you need.
Props = $8
4. Accessories
Last, but not least are all the little details that make your cosplay really stand out. The belts and bracelets and rings and chains. Most of these are things you can make with various items you have around the house. Reusing old belts to make new ones or old jewelry to create what you need. But don’t forget about asking your friends and family members if they have something similar and those social media groups where one man’s trash is another man’s treasure.
If you simply can’t find anything, thrift shops and garage sales are the way to go. Remember to think outside the box, just as you did with clothes. Dye something a different color, or use extra materials to make it look the way you want it to. Some things you still might need to buy, but remember to reuse everything you can - from toilet paper rolls to random wires you might have.
Which leaves you with $5 to add anything and everything you want to your cosplay.
Let’s Put Theory into Practice!
I am going to walk you step by step on how I made my Ira cosplay along with the prices of everything. Please take into consideration that this isn’t my first rodeo - I have been cosplaying for years and have a literal stockpile of wigs and random clothes that I might need one day.
Starting with the headpiece, I decided to reuse a wig from an older cosplay. I realized I had 3 wigs that were almost identical, so I just took one and got to styling. One big scrunchie that I had at home and a pair of scissors later, and the wig was starting to look like Ira’s hairstyle. So this cost me nothing. What did cost me was the golden paint I used for her crown. The headpiece itself is made from moosgummi (a type of rubber foam) that I got from a friend, so the only expense I had there was the golden paint. I used a marker that cost me $3 from my local hobby store.
I also bought the headband at a drugstore for $2 and wrapped it in red cloth that I had lying around (it was a shirt that I didn’t need).
TOTAL FOR HEADPIECE: $5
Moving on to the clothes, I got into my moms closet and found the exact pants I needed! For the kimono, it’s actually a bathrobe that I never really used. So I put the golden edges on it and burned and cut it to make it look ragged like hers. The golden silk used for the edges cost me $4. I also painted a very subtle pattern on the kimono with a fabric paint which I bought 5 years ago. I just used a regular black shirt I had for the undershirt.
The bandages for the legs were also bought at my local pharmacy for around $1 a piece, so $4 total, 2 for each leg. As for the hand bandages, I ripped up some old sheets and put them together to make one very long bandage, which I again painted with a paint I bought over 5 years ago. I thought of buying flip flops, but then remembered a group I’m part of where people give and take things they need or don’t need. So, I asked for and got flip flops… which were pink. But the same friend who supplied me with moosgummi (Valen, if you’re reading this, thank you!), got me brown acrylic paint. So I just painted over them.
TOTAL FOR CLOTHES: $8
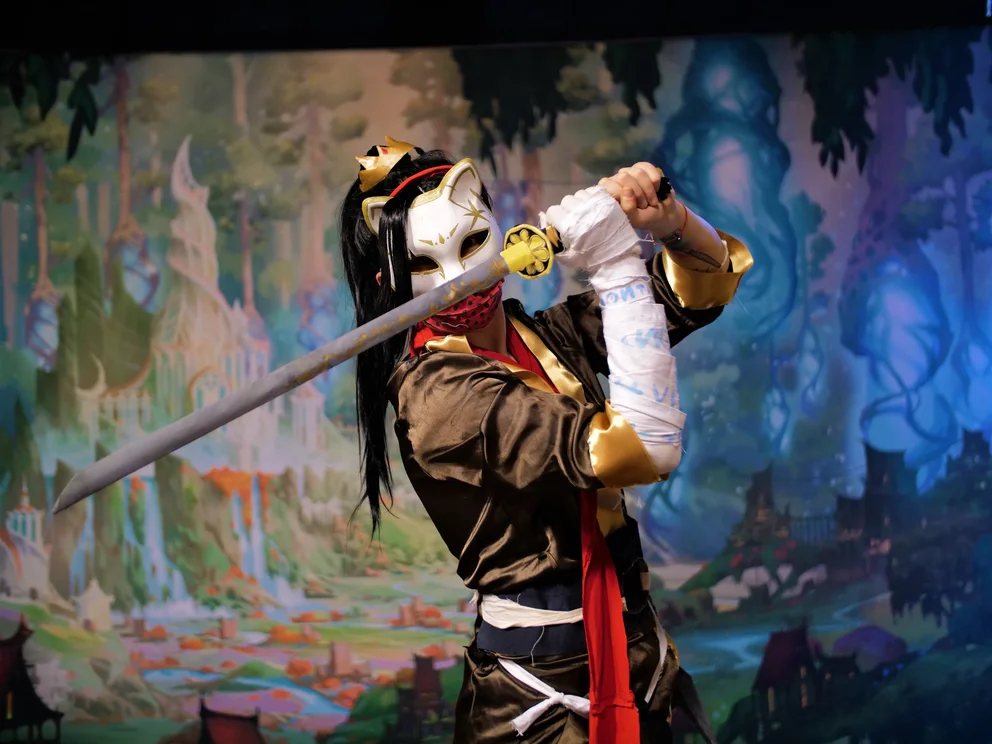
One of the props was pretty straight forward - the cracked Mask of Momentum. I bought that one for $5 (found the cat mask I was looking for) and just painted on the details with the same golden marker I used for the crown.
The problem was the Edge of Autumn. The only katana I had made before was one made from real aluminum plates, and I did not have the time or the patience to go through that again. Luckly, here comes the origami part I was talking about. MY S.O. found a tutorial for making paper swords and boy did he make it perfect. He drew on the details with a pencil and I filled in the details with a golden marker (bought a new one for $3) and painted the metal part with a gray marker I bought for another $3. The handle part was simple - I destroyed a shirt I didn’t need anymore and had some leftover gold silk from the kimono. As for the sheath of the Edge - also paper. I had enough leftover brown acrylic paint and gold marker to paint it.
TOTAL FOR PROPS: $11
A total of 3 kunai knives, 3 belts, 1 scarf and 1 leather baggy were my accessories. The only thing I bought was another marker for the kunai knives - now let me walk you through it.
Just like the Edge, the kunai were made from paper. I used the remaining scraps of white cloth from the hand bandage to wrap them around the kunai for the effect I needed and bought the gray marker (another $3) to paint them.
I needed 3 belts - one for the Edge, one for the kunai and one as a fashion statement (the big one with the ring at the front). One belt was made with leftover fabric from the kimono (remember how I said I destroyed it?). The other was made with the help of my good friend - coffee. I took the leftover sheets and literally just soaked them in coffee, cooked for half an hour and left them to soak it up. The result was a bit worn out beige color - perfect for the belt. The big boy was a bit of a problem. I got some sort of strong material for the base part from my neighbor (who is also a cosplayer) and the middle ring part is literally a plastic cap from a chips tube, wrapped in paper and painted with the same markers I had.
The scarf was a bit problematic as I had to remake it. The one I wore at The Calling Krakow was the leftover material from the red shirt (the one I used for the headband). However, it wasn’t what I really wanted, so I made another one from an old jacket. Again, not a dime spent.
Lastly, the leather baggy is something I wanted to use as a prop for a while and it was the perfect deckbox. I had it for a while and it’s actually a big phone case.
TOTAL FOR ACCESSORIES: $3

The conclusion?
I ended up spending less than $30 on this cosplay. It’s still missing some details, such as the black glove in her other hand or the contact lenses, but that will all come in due time.
When I was remaking her for Lille (some parts needed to be adjusted and fastened and washed), I wanted to make a whole new Ira. With a new mask, a new sword, new kunai, new everything. But then I remembered why I chose Ira in the first place - to prove a point. To prove that you don’t need worbla, a lace front wig, or a $1000 budget to make a good-looking cosplay.
Do remember that most of these things I already had at home, because I’ve been doing this hobby for a long time. As I said in the beginning, cosplay is the most expensive when you’re just starting, but don’t let that discourage you from trying it out!
Valera is a Flesh and Blood player, cosplayer, and an author of content relating to cosplay. The opinions expressed in the above article are her own and do not necessarily reflect the views of Legend Story Studios.