Anthony Harden brought Kavdaen, Trader of Skins to life at the Pro Tour: New Jersey cosplay contest, followed by Fai, Rising Rebellion at the Las Vegas World Premiere of Uprising. Today he joins us for the first article in our brand new Cosplay Corner series, discussing how you can create armor for your next (or first!) Flesh and Blood cosplay.
Putting together your first cosplay is an unforgettable journey, I remember sitting in my parent's garage sawing apart PVC piping and using paper mache to create my first ever prop. Originally I didn’t know where to start or what materials were needed to make a cosplay, all I had were reference images from a 15-year-old game. While I succeeded in making the cosplay I wanted, it took trial and error to get the design exactly how I wanted. I want to help demystify the process of creating your first cosplay by breaking it down into a few easy-to-follow steps. Flesh and Blood helped me rekindle my love for cosplay and armor-making so I want to share the knowledge I’ve gained throughout the years with the community. Welcome to Rathe Armor 101, today we will cover the essential steps when starting your cosplay as a hero of Rathe.
Step 1: Choose Your Character
Deciding which hero I want to embody is my favorite AND the most stressful part of starting a cosplay. Card games like Flesh and Blood have endless options and spectacularly designed heroes, so it can be easy to fall into the trap of choosing someone intricate and flashy. If you're up to that challenge, then full steam ahead! However, I recommend young heroes like Dash and Kano for newer members of the cosplay community. Young heroes are typically easier to break down and understand than their adult counterparts as they usually have less gear and moving parts. This tends to make the project less time-consuming and cheaper, which sets you up to start your next project much faster!
Step 2: Grab Your Gear
Like the Kavdaen and Azalea, cosplayers need equipment to ensure we have every advantage possible. These tools are the costuming staples I use in nearly every project:
- Hobby Knife: Also known as a utility knife or Exacto knife, this is a precision cutting tool we'll use to create stencils and cut foam.
- Contact Cement: I wish I had known about this miracle bonding agent when I created my first costume. Contact cement bonds to itself after it dries, making it the ideal tool for gluing pieces together. When using contact cement please use a respirator as the fumes can be toxic.
- Heat Gun: As the name suggests, this handy tool heats things. You'll use this to speed up the drying time of contact cement, mold Worbla, and even warp foam.
- EVA Foam - I can't stress this enough, EVA foam is every cosplayer's best friend. EVA foam is cost-effective and widely available at most craft/department stores. It's the star of the show when creating armor and weapons thanks to its lightweight and malleable properties. It comes in a variety of sizes, but I always keep 2mm and 6mm sheets on hand.
- Thermoplastics - While not as commonly used as EVA foam, thermoplastics like Worbla are needed for more rigid equipment. When warmed, the thermoplastic sheets become moldable and easy to shape. Worbla is expensive but creates very durable long lasting armor.
- Personal Protective Equipment - Gloves, Goggles, and Respirators are the three most common forms of personal protective equipment (PPE for short) when cosplaying. Contact cement is considered toxic and should be applied while wearing gloves and a respirator. When sanding EVA foam or Worbla wear a pair of goggles and a respirator to protect your eyes and lungs from particulates.
- Other - Cardstock / Paper for stencils, Pencils / Markers, Paint, Primer, and a Cutting Board.
Step 3: Sketch It Out
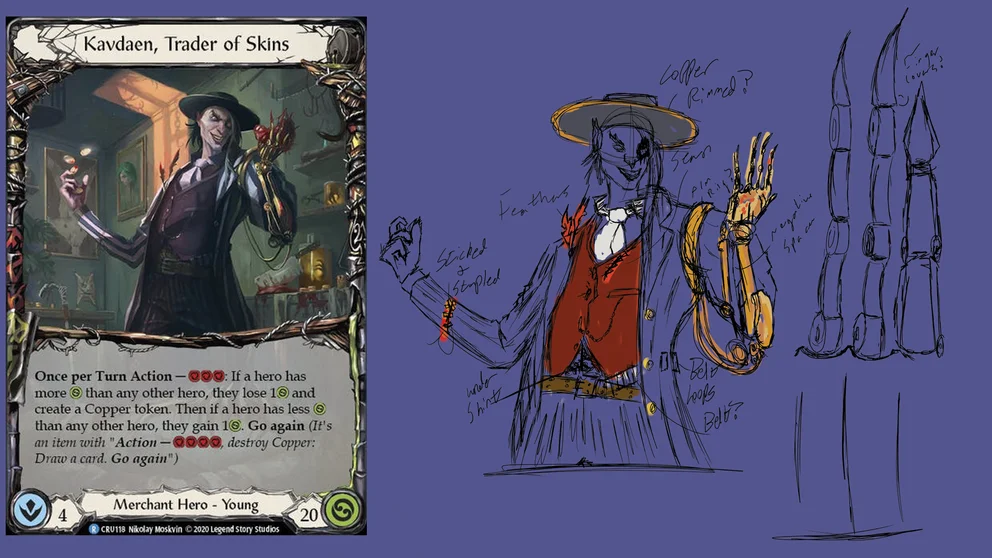
An excellent first step is to make a quick sketch of the hero you want to cosplay. While you might say, "But I'm not an artist, I'm not good at drawing," this step helps train your eye to notice minor details. When I created Kavdaen, it helped me figure out how the tubing from his arm should connect to his back. For Fai it allowed me to understand how his pauldrons were shaped and how I should make his stencils.
For characters with simple designs, it's crucial to find what sets them apart and makes them identifiable. For Bravo, this might be his hammer; for Dash, it's her belt and accessories. Sketch these pieces and take the time to figure out how to make them easily identifiable.
These sketches also help you create a visual shopping list. Make notes next to each part of the costume as to the fabric or type of clothing needed to complete the look. If sketching is out of the question the same labeling trick can be done next to the card's art.
Step 4: It’s Stencil Time
Stenciling is by far the most important step to creating your cosplay armor. While generalized stencils can be found online, by making our own we know our cosplay will fit us perfectly every time. Just like the heroes of Rathe we all come in different shapes and sizes so having our stencils on hand will make sure we look like the armor was Taylor (tailor) made for us. Stencils are quick and easy to make in 4 easy steps, we’ll be using the forearm as an example but the steps are the same for all body parts. (Optional Step 0: Grab a friend to help with your torso or head as they are difficult to stencil alone) 1) Wrap your forearm in plastic wrap to protect your skin. 2) Wrap masking or duct tape around the plastic wrap completely covering the forearm. 3) Draw a seam line along the length of your cast and cut it out using scissors. You will want to section the cast into 3-4 pieces for easier stencil making for larger or rounded body parts such as the torso or head. 4) Flatten and draw your cast onto cardstock to complete the stencil. These stencils can be duplicated and altered to match the hero's aesthetic you are going for.
After I made the forearm stencil for Kavdaen I could reuse the same stencil for Fai saving myself a bit of time. For larger Shoulder Pads or Pauldrons such as the ones Oldhim wears you will want to use half of a large styrofoam ball to get their large rounded shape.
Step 5: Buy Simple And Make Modifications
Early in my cosplay career, I learned that store-bought shouldn't be a bad word. Are there pants or a helmet at your local army surplus or thrift store that looks similar to your character? Buy them now and thank me later. Anything that saves you time and money will allow you to pour your focus into the more intricate details and modifications. Once you have the essential pieces, you can alter the look with dye, glue, and a simple backstitch.
For Fai, I was able to modify an old motorcycle jacket to be under armor and the emberblade was a toy katana I remodeled and painted to look like Fai’s. Even Kavdaen’s vest and belt were found at a local thrift store and with a little bit of weathering they fit his aesthetic.
Step 6: Assembling The Look
Using the stencils we created earlier, trace their design onto EVA foam, cut the foam using your hobby knife or scissors, and use contact cement to adhere the foam together. To round out helmets, breastplates, and shoulder pauldrons use the heat gun to make the foam malleable and shape the foam with your hands. EVA foam is a very forgiving material. Is a piece too large? Grab a ruler and scissors to cut off any excess foam. Is a piece too small? Cut an extension to the foam out and adhere to it using contact cement. Practice makes perfect and EVA foam is a great beginner's material. While creating Fai’s pauldrons I decided last minute to extend them roughly 2 inches to be more pronounced, with EVA foam this alteration took 10-15 minutes to complete.
Don't be afraid to alter your character's look to fit into the restraints of the real world. When I created Kavdaen's prosthetic arm, it took two attempts to get it right. Even though my first attempt was more in style with the original artwork, it looked awkward when attached to my real-life body. Kavdaen's prosthetic arm is unnaturally thin, and to match the look I wanted the fingers were modified to partially wrap around my fingers. This made Kavdaen’s fingers viewable from all angles and hid my hand underneath. The second attempt was much easier to create as I had a stencil of my hand prepared and ready to go.
Step 7: Don't Skimp On The Details
For most heroes, this isn't their first rodeo. They've been in battle and had to fix their armor. I personally love to weather my cosplays with weld markings with hot glue and armor scratches with my hobby knife. For characters with capes and cloaks, have some fun shredding the edges to create a war-torn look.
Kavdaen had scratches added to his arm and gashes to his shoulder piece as you never know what clientele visits him in The Pits. Plastic nuts and bolts were added along the seams of Kavdaen’s arm to create a manufactured look and hot glue was used for fake weld markings. Fai’s pauldrons had claw marks added to emulate a chunk being taken out by Dormai’s dragons. The pauldrons were textured using hot glue to create a slightly melted look due to Volcor’s heat. If I was to remake the pauldrons I’d retexture them using 2mm EVA Foam for a sharper beveled appearance.
Step 8: Painting
DO NOT FORGET THE PRIMER. Priming your surfaces is as important as the paint itself. This base coat allows adhesion, improves durability, and cuts down on your needed coats. I speak from experience, do not forget the primer. Do not forget the primer. Do not forget the primer.
Once you have primed your surface, play with paint combinations. No armor is 100% silver, and no helm is perfectly gold. If your hero is known for their ruthlessness, then red and brown might be needed to add some bloodstains to their armor. Mix colors to give a more realistic look and finish with a black wash to darken the recesses or add a grimy look as needed.
Kavdaen’s arm was painted in the following steps. Primed, Gold Base Coat, Red Wash all over, Black Wash all over, Gold Edge Highlights. For added detailing red wash was pooled on the fingers for blood stains and black wash was pooled around mechanical parts for oil/grime buildup.
Step 9: Make It Work
Now comes the hard part: putting your costume on. Our heroes might have the magic necessary to hold their costumes together, but here in the real world, we need to get creative and find ways to make these costumes functional and comfortable. Your hand will tire of holding that big shield all day, and your askew belt will slide without additional support. Try using D Clips to attach that shield to your arm so you aren't spending hours holding the handle, and try using velcro to attach the belt to the pants. Elastic bands can also hold bulky coats closer to the body, giving your clothes a more fitted look. People will love your cosplay, but making it comfortable will ensure you love it too.
Fai’s cross strap was attached via velcro to the motorcycle jacket and elastic bands were used to hold his robes close to my torso. Kavdaen’s tubing was attached to the trench coat using contact cement and the trench coat was held tight to the vest using velcro creating an integrated look to my body.
Step 10: Be The Hero And Have Fun
You chose your avatar, you created the costume, and now it's time to become them! Does your character have a crazy look in their eyes? Make faces and pose in the mirror. Do they have distinct makeup or scars? Practice your makeup a few times before you go to The Calling. But most importantly, Have Fun! Find and reignite your sibling rivalry as Fai with any Dromai cosplayers. Make shady deals with the Ragamuffin cosplayer as Kavdaen. Or even Crippling Crush Katsu as Bravo, safely of course
Cosplaying is a ton of fun! I hope to see some new cosplayers at future events. If you're intimidated by the complexities, try to find an easier hero and go from there. Everyone starts somewhere, and the FaB community is wonderful and supportive. Thank you for attending Rathe Armor 101.
Anthony Harden is a Flesh and Blood player, cosplayer, and an author of content relating to cosplay. The opinions expressed in the above article are his own and do not necessarily reflect the views of Legend Story Studios.