You may recognise him for his Viserai cosplay, but Matthew Ayers has been diving into the world of filament, Blender and propmaking, creating far more than just the Arknight's helm. He joins us today for our final Cosplay Corner article of the year, providing you with your introduction to 3D printing!
3D printing has always been one of those technologies that was elusively cool to me. Luckily, within the last several years the cost of entry into this hobby has drastically fallen. More and more companies are producing “entry level” printers. With this has come a huge surge in popularity. I personally think that one of the most natural fits for 3D printing is in prop making and cosplay as a whole. You can get a printer capable of printing a whole cosplay armor for around $150 these days. The utility of a 3D printer is limited only to the imagination of its owner! Read on to learn how you can use the power of plastic spaghetti to embody your favorite Flesh and Blood characters!
Why 3D Printing?
There are many creative outlets for fans to use to bring their favorite heroes to life. Why should you consider using a 3D printer over something else, say EVA foam? In my opinion, one of the major benefits of using a printer is structural integrity. EVA foam is wonderful for armor that is form fitting and shaped to your body but sometimes you want a sword that can take a little bit of abuse without bending. Since 3D printed parts are made out of hardened plastic, they generally hold their shape a little better than foam. Of course, since these pieces are made of plastic, they are not indestructible and sword fights are not recommended! You can however take extra measures like adding holes right into the model to allow a rod to be run through the whole print!
Another great perk of 3D printing is its repeatability. Once you have the digital “blueprints'' for the prop, you can create an endless stream of nearly identical duplicates. So how does this benefit cosplayers? The main use I have found for this is for things like iterative design where you can test a design and then make improvements while keeping the main design the same. It is also helpful when making large amounts of detailed pieces. For example, scales for scalemail or greebling for larger designs.
Another benefit is due to the unique method of production. You can create objects that are otherwise difficult or impossible to produce. These can include print in place chainmail and hinges that require no assembly post print.
Types of 3D Printers
The two main types of 3D printers are most commonly known as FDM or SLA. You may have also heard them referred to as Filament or Resin printing respectively. They each have their own pros and cons but we will focus mostly on FDM printing as that is what I think is the most beginner friendly
FDM Printing:
FDM printing uses spools of plastic known as filament to produce prints. The plastic spools are fed into the hot end of the printer which melts the plastic. This plastic is then “printed” in layers on the print surface. As a layer is completed the print surface is moved down and the process begins again. This is the most common type of 3D printer for hobbyists and is generally cheaper than SLA. This is what I would recommend for most people. These printers excel at printing large props due to their larger print volume. The detail is not quite as profound as SLA prints but when you are printing armor and weapons, this is usually not an issue.
SLA Printing:
SLA printing uses a drastically different method of producing prints. Instead of using spools of plastic it uses liquid resin. This resin is added to a reservoir and a screen is lowered into the resin. The screen uses UV lasers to cure or solidify the liquid. This method traditionally produces much higher quality prints but is more expensive and generally has much smaller print volume. There is also some additional post processing work that needs to be done with Resin printers. Once the print has been produced you need to wash and cure your prints. Resin printers can also emit toxic fumes so proper ventilation is a must!
I would recommend sticking to FDM printers, especially if you are new to the hobby. SLA printers are great at creating smaller more detailed prints like small figures but generally speaking I believe that FDM printers are much better for cosplay.
Types of Filament
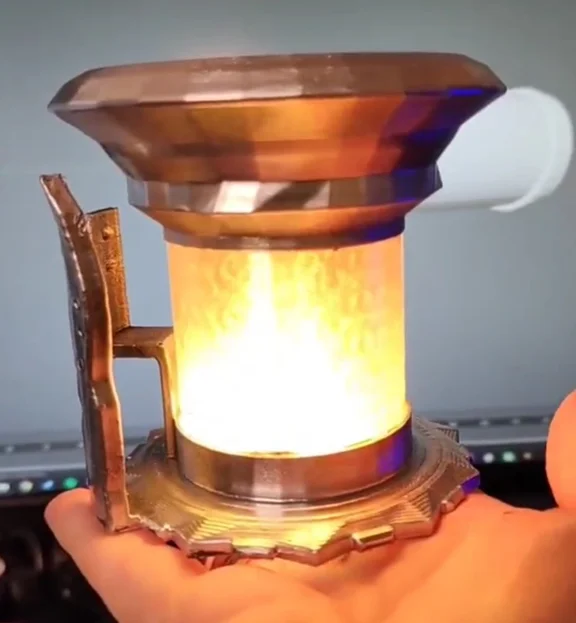
As stated above, most filament is a hard plastic but this is not always the case. There are many different types of filament on the market. The most common filament is PLA which stands for Polylactic Acid. This material is usually made from plants such as corn! PLA is generally the cheapest and easiest to use material for 3D printing. It is reasonably strong and has a decent melting point. It also comes in a great variety of colors! One of my favorites is transparent! This can be used for allowing lights to shine through prints.
I always recommend that you sand and paint your prints but there are some truly stunning PLA variants out there if you wanted to leave them raw.
My favorite filament is PLA+. This is PLA with additives that make it slightly harder. I have broken quite a few props printed in PLA but have never once truly broken a PLA+ print through regular use. Of course, this will vary depending on what the prop is and how much you use it. Another great perk of PLA+ is a slightly higher melting point. If you leave 3D printed items in a particularly hot parked car, they may begin to warp. PLA+ is slightly more resilient to this. It is a little bit more expensive than PLA and you may want to check the print temps listed on the box with the highest heat settings on your printer.
Another great filament type is TPU. This is a flexible filament! This is used for printing anything from armor joints like elbows and knees to wearable shoes! There are other flexible filaments but this is the most common. There are also food safe filaments such as PET. This is actually the same material used in some drink cartons. There are even ways to recycle old bottles into usable filament! I would recommend using a food safe option for anything that will have prolonged use in your mouth.
This is just the tip of the iceberg for specialty filaments. There are filaments with wood in them that can be stained, filaments with metal in them that can be rusted to create “antique” looking props, carbon fiber filaments. and many more!
3D Modeling
There are an astonishingly high amount of digital files out there for you to try your hand at printing. I would highly recommend starting out with some simpler files. Don’t try to dive into the deep end before you can swim! There are plenty of “calibration” files out there to print. I highly recommend the infamous “Benchy”. Once you are ready to tackle that big project though you will need files! There aren’t many people making 3D models for Flesh and Blood yet but I hope to change that! I strongly encourage each of you to try your hand at 3D modeling. There are numerous programs out there for creating 3D models. The one that I use is called Blender. It is free and open source! It has a tremendous community around it as well. There are so many tutorials available for free on Youtube! That is how I got started with modeling. I think that one of the many “Donut” tutorials is a good way to get started. While you won’t be able to search for “how to model Anothos”, you can find tutorials on things like modeling a wooden barrel. You really have to get creative with your learning! Don’t go into the hobby with the mindset of having everything laid out for you. Once you get a little familiar with the program, delve into some of the more intricate options. Take time to practice what you’ve learned. If you learn how to make a barrel, try to make the head portion of Anothos. Break things down into simpler shapes and work your way up to the details. Another helpful tip is to save iterations of your work. If you are about to make a drastic change like applying a modifier, save a copy in case it doesn’t work out.
Example Workflow
How I make each 3D model usually has a very similar workflow. I start out by blocking in the basic shapes. I usually start with a plane and extrude edges and vertices to build the basic shape. A really helpful tool for anything symmetrical is the Mirror modifier. It does exactly what the name implies. It reflects whatever you model across one of the three axes. After I have the basic shape down I add a solidify modifier. This effectively adds some depth to the model. Don’t worry if everything looks “boxy” right now. For organic shapes we will apply a subdivision modifier that will make things look much smoother . A good rule of thumb when modeling anything that you will subdivide is to make sure each of your polygons or “faces” has 4 sides. This is not a requirement but will definitely help in keeping your geometry simple and will prevent errors later in the process. I highly recommend cleaning up your geometry as often as possible. To do so, you can go into edit mode and select options out of the Clean Up tab of the Mesh menu. If you are working with organic shapes I would highly recommend using the sculpt functions in blender. It allows you to make drastic changes to your model without having to click and “extrude” everything manually. Sculpting works best with a pen tablet but a mouse is absolutely fine for getting started! For geometric shapes I would stick with the standard Layout tab. Just keep extruding and modifying polygons until you get something that looks right!
Another great tip for modeling is to draw 2D sketches of the item you are modeling or try to find existing images of the object from multiple angles. You can add these into Blender as reference materials! Try to find or create images for at least the front view and the side view. This helps with keeping scale consistent.
Slicing
The most common file that you will use when 3D printing is an .stl file. These files are easily found online or made using a plethora of modeling software. They are effectively the raw 3D model. Your printer can’t convert this file into instructions by itself so you must use slicing software. There are numerous options online, each with their own features. Cura is my go to slicing software but they are reasonably interchangeable. What the slicing software does is converts the .stl into G-code. This code is essentially a set of blueprints on how to print the object. Since each printer is unique and things as simple as your region’s humidity can change how you need to print things, you may need to tinker with your slicer a little to get the settings dialed in perfectly.
Since the printer builds using layers, you may be wondering how the printer handles objects that have overhangs. In most slicer software there is an option to generate supports. These are essentially added plastic that is easy to break free from the finished print whose sole purpose is to provide a “platform” for the object to be built upon.
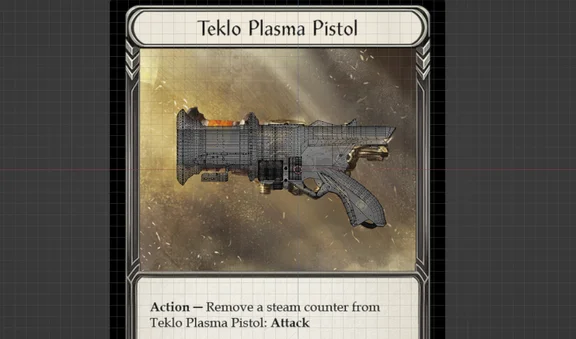
You may also wish to print larger items on smaller printers. For instance, printing a helmet or a sword on a printer with a print volume of 220 x 220 x 250mm such as the Ender 3. There are numerous programs that you can use to “cut” the models up into more manageable pieces. Most of them will allow you to add a printer profile which will add a reference box for your printer’s build volume. This same process can also make printing complex objects easier. For instance, when I print Teklo Plasma Pistols I cut it into three main chunks in order to minimize the amount of supports I need. Essentially I cut the barrel off and print it vertically and then cut the rest of it in half so that I have very minimal overhang anywhere. This makes the final result much cleaner in my opinion.
Helpful Tools
- Nippers (Most printers come with these)
- Heatgun
- Hot Glue Gun
- Super Glue and Cyanoacrylate Glue
- Soldering iron or Wood Burner
- Rotary Tool
Nippers are used for cutting off support material or simply trimming prints. The heat gun is used to warm the material which makes it pliable. This is great to make custom armor molded to your body. For instance heating a bracer and putting your arm in it to mold it around your arm. Be careful not to burn yourself! The glues are there for attaching the pieces you cut when printing together. An even better method of adhesion is actually using the soldering iron or wood burner with an old tip to melt the plastic together. You can hang on to broken pieces of other prints and use them to melt into any gaps you may find as well. This creates a permanent bond and I highly recommend using this for any pieces that need to be worn or carried for extended periods of time. The rotary tool is also great for trimming pieces. Sometimes the files you find don’t fit you and the easiest fix is removing a section.
Finishing Props
Once you get the prop printed out you can finish it any way you want! This is where your creativity will truly shine. There are however a few tips and tricks that I wanted to share.
No matter how perfectly dialed in your printer settings are you will still have some form of layer lines. These are ridges caused by gaps in the plastic layers. There are several ways to deal with this issue. Some of my favorites include a thin layer of plastic epoxy or "Bondo”. This material is commonly found in automotive stores and is traditionally used in car body repair. This is also a great way to deal with small imperfections and holes in your prints. Another way to deal with layer lines is to just sand them down. This is actually not as hard as it sounds. I recommend starting with 60 grit sandpaper for larger flat areas and working your way up. You can absolutely use a palm sander for this but be careful to not stay in one place too long as the friction may warp the plastic. For more detailed areas you may want to stick with a higher grit sandpaper and just take your time.
One of your best friends when dealing with surface imperfections is sandable filler primer spray paint. This stuff has saved me more time than anything else. While I still recommend sanding before your first layer of primer, this stuff fills gaps and then has a sandable surface on top to allow for quick layer line removal.
Once you have a nice clean surface from sanding and priming your print you can go about painting it with whatever you have access to. An airbrush is a great tool for creating smooth and professional looking results. I actually end up using mostly spray paint and cheap acrylic paints. For instance on this Mandible Claw, all I used was a beige spray paint and then just some cheap acrylic paint that I had on hand to add the darker brown. If you don’t have any paint brushes feel free to use your fingers! Finger painting is not a crime! If possible, you should test paints on broken or failed prints as not all paint works well together. For instance, some brands of automotive clear coat turn milky white when sprayed over some household spray paints.
Health and Safety
While most FDM printers and filaments are relatively non toxic, you should still consider having your printer in a well ventilated room. Don’t stick it in a closet and keep it running nonstop if possible. A pretty common concern I see about 3D printers is that it might catch fire. This is not as common as you would think with a device designed to reach high temperatures to melt plastic. The most common fire hazard is actually just the electronic components in it. That said, it is advisable to get a heat shroud and some way to monitor it if you plan to leave it running while you are away. This is not required but just a step that I have taken for peace of mind. Probably the most dangerous part of this hobby is the finishing process. Most of the things that I mentioned above are not great for your lungs. Please wear a mask and finish your props in a well ventilated room if possible. Spray paint, the tiny plastic pieces from sanding, and the fumes from melting the plastic with the soldering iron are all best kept out of your system
Recommended “Intro” Printers
As with any hobby there is a little bit of a startup cost to get into 3D printing. As I mentioned before though it is becoming increasingly easier to find cheap but effective printers! Here are a few printers that are great for beginners.
Ender 3: $100-180
Arguably one of the most common and easy to recommend printers out there. While they are getting a little dated, they are relatively cheap and can even be found on sale for around $100 at Microcenter and other stores like it. There are many aftermarket options for customizing and upgrading this printer as well. One of my favorite things to print are actually upgrades to the printer itself
TronXY Crux 1: $180
This is a very small printer. The size is a blessing and a curse. You don’t have to dedicate a ton of room to it but might have to cut up prints into smaller pieces. Very good for shared spaces or apartments with minimal work areas
Elegoo Neptune 3: $200-300
Tons of extra features and works very well out of the box. Very easy to setup and get started right away
If you want to take a look at some more really cool printers please check out this video by FranklyBuilt. He covers the above printers and many more!
Additional Costs
The largest source of additional cost in this hobby will be your filament. Depending on what material you get, a spool of filament is around $15-20 for Pla/Pla+. Each spool of filament is 1kg of material. With this you can print a large volume of items. Just for reference, these mandible claws are about 400g or a little under half a roll each. So for around $12 you can print both claws! You will also want to consider the price of the other tools I mentioned above. The most important tools that you absolutely need are a soldering iron and a hot glue gun. You can get those for around $10 and $5 respectively. You can use whatever paint you prefer but I like to use spray paint that averages around $5 a can. These cans will cover enough area for several props. Specialty paint might be a bit more expensive. For the Mask of Perdition I used automotive paint to layer the Hot Rod red over the gold. These fancier paints were around $12 per can.
Conclusion
In conclusion, 3D printing is a varied and powerful tool for creation. It takes a little effort to get into the hobby but once you do you will have an amazing weapon in your arsenal. Sometimes things will break. That is perfectly ok though! I have learned so many skills from this hobby that I absolutely would not have thought to try otherwise. You will learn patience. These printers do not print instantly. You can have prints that take up to as long as several days! Most prints average between 3 and 12 hours. The good news is, you can leave these printers running and every morning is like Christmas when you go to find what new toys await you! 3D printing can even be used in combination with other cosplay tools. For instance I ran into a deadline for my Viserai armor and had to incorporate EVA foam into the mix. I had never worked with foam before but I think it turned out ok! The helmet, sword, and spiked shoulder are printed and the rest is foam. Another great use is if you need a special buckle or latch for your foam costume you can custom print one. One of my favorite things to do to add that extra flair to my printed props is to add LEDs. You can motorize parts using servo motors as well. The possibilities are endless! I hope you have found this article helpful in some way and I cannot wait to see what this amazing community creates! Please feel free to reach out to me on any of my socials with any questions or for advice!
Matthew Ayers is a Flesh and Blood player, cosplayer, and an author of content relating to cosplay. The opinions expressed in the above article are his own and do not necessarily reflect the views of Legend Story Studios.