For our second season of ProQuest, we've invited guest writer Wesley Lingard to work on a two-part article series for our website. Wesley is an Australian competitive player who aims to be one of the first to put points on the Living Legends table for Azalea. He has previously written strategy content for various platforms, and recently began uploading video content under the alias Endless Arrow. This is his first article, discussing the importance of the reaction step!
The Reaction Step of combat is an important part of playing Flesh and Blood and it often involves decisions that can win or lose you the game. Improving your understanding of the rules and strategies surrounding the Reaction Step is a key part of improving your play style.
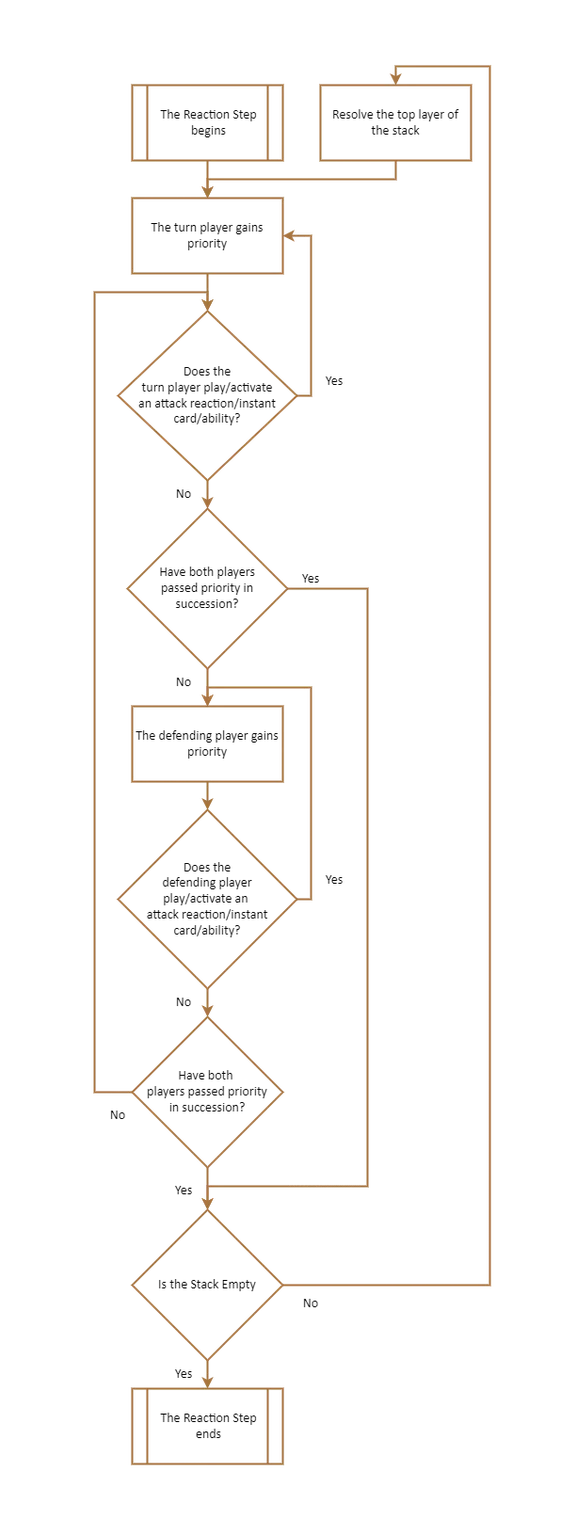
During combat, after your opponent has declared their defending cards (during the Defend Step) and both players have passed priority, the Reaction Step begins. In this step, both players have the opportunity to play and activate reaction and instant cards and abilities to potentially change the outcome of the attack. Players can buff the attack, add additional defensive cards, buff defending cards, grant new on-hit effects to the attack, and many other options they have prepared in their deck. The Reaction Step begins with the turn player (attacking player) gaining priority, allowing them to play or activate reactions or instants giving priority to the defending player before they resolve. Depending on what players use during this step, the process can be quite repetitive and I would suggest using this flowchart as a guide to help you navigate the order in which cards and abilities resolve. When a player plays a card or activates an ability, instead of the effect resolving immediately the card or ability is added as a layer on the stack. Keeping track of this stack throughout the Reaction Step is crucial for timing when to make a play as it determines the order in which effects will resolve. Each time a layer of the stack resolves, it is the turn player who is given priority and the Reaction Step only ends once the stack is empty and both players pass priority in succession.
As you can see this process is easy to get lost in, but it is important to know how to manipulate it to your advantage. If you are still getting used to the order of priority and when different layers should resolve, it is good to take it slow. Take each step one at a time and talk it through, out loud, with your opponent. I recommend doing this every game until it starts to feel more natural.
Now that we have an understanding of the complexity of the Reaction Step, let's talk strategy. The Reaction Step is all about waiting for the right moment. One common situation that occurs in a lot of games is when you are attacking your opponent and the power of your attack is higher than their remaining life. You are on the verge of winning and you happen to have an attack reaction in your hand. If your opponent doesn’t declare any blocking cards and the combat moves to the Reaction Step, do not play your attack reaction. Your opponent is in a situation where they need to gain life or play a defensive card during the Reaction Step to stay in the game and by playing your attack reaction early, you are giving them more information.
It is in your best interest to force them to make the defensive move first. One outcome that may occur is that your opponent blocks your attack with a powerful defense reaction like Unmovable, making it impossible for you to beat them this turn with your attack reaction. In this case, your opponent still doesn’t know you have a reaction and you can save it for the next turn putting it in your arsenal. However, what if your opponent plays a defense reaction, such as Sink Below, only blocking enough of the attack to stay alive, but leaving enough room for your attack reaction to knock them to zero health? When you first gain priority, Sink Below hasn’t yet resolved, and by playing your attack reaction your opponent has a more informed decision about whether or not to use Sink Below’s effect when it resolves. It is better for you to pass priority in succession, allowing Sink Below to resolve, following which you gain priority and can play your attack reaction to try and win the game.
This way of thinking is very much the same when playing an attack with an on-hit trigger effect. You want to minimize the information given to your opponent to maximize the chance that your on-hit effect triggers.
As a defending player, you need to be aware of this way of thinking to try and predict what your opponent may do during the Reaction Step. Make yourself familiar with the attack reactions your opponent's hero has access to in deck building and identify whether any of them are playable on the current attack, given the number of cards your opponent has in their hand and arsenal, and the number of resources they may have access to. Don’t forget that some equipment and aura cards in the game can be used as attack reactions or instants, bringing them into consideration when calculating your defensive strategy. As an example, you could be up against a Ninja hero who is finishing off their turn with a Pounding Gale, using its Combo effect to double any damage you would take when it deals damage. Looking at the game you see they have no pitch left, having used the rest of it to play Pounding Gale,.owever, they do have three counters on Fyendal’s Spring Tunic and therefore could create a resource during the Reaction Step.
Continuing your observation you see that they have no cards in their hand, but one left in their arsenal, and their Breaking Scales is equipped. If you consider these facts and the possible attack reactions that could be used in this situation, the most power your opponent could add to Pounding Gale is +4, getting +1 from Breaking Scales, and +3 from a red Razor Reflex (paying the cost with the Fynedal’s Spring Tunic). This outcome is especially threatening as the damage would be doubled by Pounding Gale’s effect if left unblocked. Using this knowledge, and assuming you have a red Fate Foreseen in your hand or arsenal you may be inclined to block the Pounding Gale during the Defend Step and save your Fate Foreseen to counter your opponent's potential reaction.
During the second season of Skirmish I happened upon an important lesson regarding the Reaction Step. I was in the finals, which was a Draft format, and I was playing Boltyn against my opponent’s Prism. My opponent’s health was low and I was attacking with V of the Vanguard charging twice (giving all my attacks on the combat +2 power), bringing the cards in mySoul to three. I still had two resources left over and my plan was that after V of the Vanguard came in with 5 power, I would attack with Hatchet of Mind for 4, then Hatchet of Body for 5. Using Boltyn’s hero ability I could banish a card from my Soul to give each of my attacks Go Again as long as their power was greater than their base power. My opponent didn’t block and we moved into the Reaction Step with the fate of the game appearing sealed in my favor. With priority, I activated Boltyn’s ability banishing a card from my Soul to give V of the Vanguard Go Again, but after passing priority to my opponent so it could resolve they played a red Blinding Beam. Blinding Beam would reduce V of the Vanguard by three power so that when Boltyn’s effect resolved V of the Vanguard would no longer be a valid target to gain Go Again, ending my turn. I was devastated and three turns later my opponent won the game.
The lesson I learned that day was to think carefully about the order effects resolved during the Reaction Step. After my opponent had played Blinding Beam, they would have passed me priority before it could resolve. I then would have had the opportunity to activate Boltyn’s ability a second time, targeting the same attack but resolving before Blinding Beam. Had I done this, I would have been left with one card in my soul, V of the Vanguard would gain Go Again, then it would be reduced to two power, then the first activation of Boltyn’s ability would fail (but that doesn’t matter because the attack already has Go Again). With Go Again, I would have been able to complete my two other attacks and potentially win the game. It all came down to the decisions and understanding of the Reaction Step.
Whether practicing at home or playing at your locals, try to think of some ways that you can start to improve upon your playstyle during the Reaction Step. One good place to start is picking a matchup you’re hoping to get better at and creating a list of the main attack reactions, defense reactions, and/or instants they are likely to run. Using this list you can start to memorize the card effects, costs, and the limits on what they can and cannot target.
Right now we are in the middle of Pro Quest Season 2, with Road to Nationals, Callings, Pro Tours and a World Championship all to come before the end of the year. I wish you all the best in your practice and hope that I have helped you to better understand how to use the Reaction Step to your advantage.
Wesley Lingard is a competitive Flesh and Blood player and author of content relating to gameplay and strategy. The opinions expressed in the above article are his own and do not necessarily reflect the views of Legend Story Studios.